The second video is equally as interesting (same group of woodsman?). There are so many awesome things going on in such a short stretch of time. Flitching with wedges, long mortising axes used for....well everything, the hewing trestles that you can roll logs right onto from the hill, a sweet chalk line/plunger/chalk cup combo, the strange yet awesome scrub plane for the inside of the water trough, and finally the sweet Hersey kiss-esque finial on top of the fountain. (Link for tablet and phone users)
Wednesday, November 13, 2013
My Fallback Plan
Just in case my life as a 17th century carpenter philosopher doesn't work out, I will definitely try out being a Bavarian woodsman. I found these two short videos during some inter-web wanderings. The first one is just the most ridiculous logging operation I have ever seen, I was slack jawed watching these crazy Germans tossing around their giant logs with nothing more than some elbow grease. Also, the man taking down the log's dimensions wins the best dressed award. (Link for tablet and phone users)
The second video is equally as interesting (same group of woodsman?). There are so many awesome things going on in such a short stretch of time. Flitching with wedges, long mortising axes used for....well everything, the hewing trestles that you can roll logs right onto from the hill, a sweet chalk line/plunger/chalk cup combo, the strange yet awesome scrub plane for the inside of the water trough, and finally the sweet Hersey kiss-esque finial on top of the fountain. (Link for tablet and phone users)
The second video is equally as interesting (same group of woodsman?). There are so many awesome things going on in such a short stretch of time. Flitching with wedges, long mortising axes used for....well everything, the hewing trestles that you can roll logs right onto from the hill, a sweet chalk line/plunger/chalk cup combo, the strange yet awesome scrub plane for the inside of the water trough, and finally the sweet Hersey kiss-esque finial on top of the fountain. (Link for tablet and phone users)
Wednesday, November 6, 2013
Nature Does it Best
I could have found definitive proof from a 1620s English woodcut of a pitchfork.
I could have designed small yet strong joints that could withstand years of bad weather.
I could have spent the afternoon dressing my stock and fussing to make sure everything fit tight.
Or...I could let nature do its thing, and take care of all the tough stuff for me.

I could have designed small yet strong joints that could withstand years of bad weather.
I could have spent the afternoon dressing my stock and fussing to make sure everything fit tight.
Or...I could let nature do its thing, and take care of all the tough stuff for me.
Thursday, October 31, 2013
Branching Out
Being surrounded by the 17th century and it's crafts and wares on a daily basis tends to seep into your psyche. As a result I have had a nagging obsession with weaving a basket. So I decided I would try my hand at it and see where it gets me.
Copying some of the period baskets that I studied at the museum, I made two sets of three spars for the bottom of the basket. And by studying I mean looking at briefly and observing all the nonessential details and ignoring the actually important construction techniques...I might have to take a better look at some of the baskets in the future.
Next I starting weaving, over and under over and under over and under...you get the point. This is where better observation would have helped me out...I was pretty much just making things up as I went along.
Step one was finding material. I first tried Green Briar because it grows like a weed around the museum. This turned out to be a big waste of time. It is kinky (not in a fun way), thorny, and quite brittle when trying to bend it, all very poor qualities when making baskets.
Flash forward a couple days and I was cutting nice Cherry coppice shoots for some wattle in a wall. After trimming off the smaller branches I noticed that they were the perfect size and springiness for basket weaving. I bundled the "scrap" and headed off to the shop after work to do some...work.
 |
| One cherry faggot! |
Copying some of the period baskets that I studied at the museum, I made two sets of three spars for the bottom of the basket. And by studying I mean looking at briefly and observing all the nonessential details and ignoring the actually important construction techniques...I might have to take a better look at some of the baskets in the future.
 |
| Six spars makes twelve spokes...now I think I am just making up basket terms. |
Next I starting weaving, over and under over and under over and under...you get the point. This is where better observation would have helped me out...I was pretty much just making things up as I went along.
 |
| Here is the bottom coming along nicely. |
After about 45 minutes I had an almost finished bottom. I tried to add the spars for the sides, but I didn't have stock that was large enough, and I need to research how I can go about bending the sticks at right angles without snapping the wood (maybe boiling first?).
 |
| Some spindly looking side spars. |
Off to the coppice grove (aka Alden House garden) to harvest some more stock before continuing this basket, stay tuned for part two shortly.
Monday, October 28, 2013
My Mallet is Still Cooler than Yours
Still fightin' words, but once again I am confident that this statement is true...plus I now have two cool mallets that could absolutely beat up yours in a fight. On top of other ridiculous goings on at the museum, I am able to make my own tools in traditional manners. As I was making some gluts out of really nice straight grained hickory I noticed that this was some really choice wood...and I could really use a carpenters mallet.
I did some quick research and found some great wood cuts and engravings, as well as Moxon's description of a carpenters mallet. So based on these overall proportions and shapes I made myself as traditional a mallet as I could (of course beech would have been the ideal choice of wood). I limited myself to only hand tools, and even used a wooden plane to smooth the faces and fair the top curve (a lot tricker than metal planes, but really satisfying). The mortise is not as tapered as I would have liked, so I added a couple pegs to keep things nice and snug.
I did some quick research and found some great wood cuts and engravings, as well as Moxon's description of a carpenters mallet. So based on these overall proportions and shapes I made myself as traditional a mallet as I could (of course beech would have been the ideal choice of wood). I limited myself to only hand tools, and even used a wooden plane to smooth the faces and fair the top curve (a lot tricker than metal planes, but really satisfying). The mortise is not as tapered as I would have liked, so I added a couple pegs to keep things nice and snug.
 |
| Heart wood and sap wood are just as useful in Hickory. |
Friday, October 4, 2013
So when do we Sharpen?
Today at the museum some of the wood-loving folks (aka wood butchers) and the blacksmiths had The Saw Wright, Matt Cianci, come over and do an all day saw sharpening intensive class. He really knows his stuff and enlightened us all on the basics of taking our old beat down reproduction saws and sharpening them to be...well...better.
Matt has a real great method for teaching novice saw sharpeners and breaking down all the steps into bite sized pieces. He first starts by explaining all the theory and saw tooth geometry. We even made a makeshift easel out of our riving break, "The most sturdy easel I have ever seen" according to Matt.

After the theory, we jumped over to the bench and Matt started on some demonstrations.
Jointing establishes a nice uniform straight tooth-line, or a bellied tooth-line in some large green crosscut saws. This is almost the most important part of sharpening a saw, without it you will slowly wear the teeth into a wavy, usually convex, mess that can be seen on so many vintage handsaws.
Next comes shaping, where we even out the teeth and establish the basic geometry of the saws. We started on Rip saw teeth, because they are much easier to file...working tooth by tooth, and focusing only on slope and rake.
Matt then explains the many ways that have been used to put set into the teeth. Hammer with setting block, saw wrest, and pliers type saw sets. He shows us his really nice pistol grip saw sets (Stanley 42x) and takes a look over and approves the ones we have for our use at the museum (APEX pattern generics). He shows us the proper use of the pliers sets...which is much easier and faster than I had imagined.
We also played around with a saw wrest that Matt spotted hanging over our workbench. He pointed out that most people use this tool incorrectly. The correct use is to place the slot above the gullets, spanning two teeth, and then twisting the wrest so that one tooth is set in one direction while the other tooth is set in the opposite direction. Using this method for set is a lot more uncontrollable than the pliers type sets...but it is an older method...so more research needs to be done to see if this is what we should be using. For the time being we are sticking with pliers sets, just for the ease of use and consistency while refining our sharpening skills.
Time to joint again!...who would have thought that sharpening a saw consisted of so little actual sharpening. At 2:00pm, after properly shaping the teeth, introducing set, and re-jointing the tooth-line, it is finally time to SHARPEN the teeth. Basically you file each gullet until the flats on the top of each tooth (introduced by jointing) disappears.
The last step is to stone the tooth-line, essentially running a medium grit stone along the side of the teeth, removing any small burs introduced by filing. This step just sweetens up the teeth and makes the saw cut a little bit smoother. And the true test...Matt grabs the first saw finished (courtesy of Ryan) and takes it for a test rip.
Matt has a real great method for teaching novice saw sharpeners and breaking down all the steps into bite sized pieces. He first starts by explaining all the theory and saw tooth geometry. We even made a makeshift easel out of our riving break, "The most sturdy easel I have ever seen" according to Matt.
After the theory, we jumped over to the bench and Matt started on some demonstrations.
 |
| No detail is too small when sharpening saws, Matt explains everything. |
We set up some "beater plates" and Matt runs through jointing, shaping, and setting. These are steps that are needed to rehab an abused uneven saw plate into a nice usable sharp saw.
 |
| "The best six bucks I ever spent" Matt says, as he explains making a rake angle guide. |
 |
| Peter Follansbee even stopped by for a lesson, he was sick of "buggering up" his saws. |
Jointing establishes a nice uniform straight tooth-line, or a bellied tooth-line in some large green crosscut saws. This is almost the most important part of sharpening a saw, without it you will slowly wear the teeth into a wavy, usually convex, mess that can be seen on so many vintage handsaws.
 |
| Jointing with "training wheels," we soon ditched the jig and went free hand. |
Next comes shaping, where we even out the teeth and establish the basic geometry of the saws. We started on Rip saw teeth, because they are much easier to file...working tooth by tooth, and focusing only on slope and rake.
 |
| Doing some practice shaping on the "beater" saw plate. By the way, the Gramercy Saw Vice is incredible. |
Matt then explains the many ways that have been used to put set into the teeth. Hammer with setting block, saw wrest, and pliers type saw sets. He shows us his really nice pistol grip saw sets (Stanley 42x) and takes a look over and approves the ones we have for our use at the museum (APEX pattern generics). He shows us the proper use of the pliers sets...which is much easier and faster than I had imagined.
 |
| The Stanley 42x is a sweet tool, it clamps the saw plate, and then engages the anvil plunger to induce the set. |
We also played around with a saw wrest that Matt spotted hanging over our workbench. He pointed out that most people use this tool incorrectly. The correct use is to place the slot above the gullets, spanning two teeth, and then twisting the wrest so that one tooth is set in one direction while the other tooth is set in the opposite direction. Using this method for set is a lot more uncontrollable than the pliers type sets...but it is an older method...so more research needs to be done to see if this is what we should be using. For the time being we are sticking with pliers sets, just for the ease of use and consistency while refining our sharpening skills.
 |
| I had no idea that this tool was a saw wrest, but it is a pretty interesting solution to putting set into a saw. |
Time to joint again!...who would have thought that sharpening a saw consisted of so little actual sharpening. At 2:00pm, after properly shaping the teeth, introducing set, and re-jointing the tooth-line, it is finally time to SHARPEN the teeth. Basically you file each gullet until the flats on the top of each tooth (introduced by jointing) disappears.
 |
| The teeth aren't perfectly shaped, but you can clearly see the sharpened versus non-sharpened teeth. |
The last step is to stone the tooth-line, essentially running a medium grit stone along the side of the teeth, removing any small burs introduced by filing. This step just sweetens up the teeth and makes the saw cut a little bit smoother. And the true test...Matt grabs the first saw finished (courtesy of Ryan) and takes it for a test rip.
 |
| This freshly sharpened saw cuts fast and easy into this half dried white oak. |
The class was very informative, and I would recommend any class that Matt is teaching. He really knows his stuff, never minds digressing...which is a quite common problem with my type...and has a contagious enthusiasm not just for saws, but for all tools and woodworking.
PS. I put these pictures on my computer and wrote this post as soon as I got home...but somehow Peter Follansbee already beat me to the punch. Well done Mr. Follansbee, well done.
Monday, September 9, 2013
The Schwarz-Follansbee Complex
A few months back Chris Schwarz posted a string of blogs (here, here, and here) about "Roman Style" workbenches. I initially passed them off as a novel form of workbench, and figured it would be interesting to see what he did with his ideas of reviving these early workbench vernacular forms (that's right, I bought a thesaurus).
 |
| Pompeii Workbench, circa 50AD |
Flash forward to last week and Peter Follansbee tells me that he is making some benches out of the oak flitches we had left over from some band sawing we had done for the "Big Fence" Project. I again thought nothing of what Peter had said...that was until I saw what the benches looked like.
 |
| A very familiar looking form |
Instantly I thought back to the spindly legged workbenches that Chris had written about with slab tops and holes for holdfasts and planing stops. The two forms, deriving from two seemingly opposite origins, shared a shockingly similar appearance, in fact, they were so similar that I almost grabbed a brace and bit, bored a couple of holes in Peters bench, and took it for a test spin.
Needless to say I did not actually go through with this plan, for starters Peter would not be too happy to have me putting holes in his benches, and secondly I need to do some hardcore research into 17th century work holding and whether or not the "Roman" form was still in use by agricultural societies...like English planters in New England...say around 1627. Off to the archives!
PS. I am pretty sure Chris and Peter are in cahoots. Kind of the ebb and flow of the hand tool world. They pretend as though they butt heads, but really they are masterminding the greatest renaissance since....well the renaissance. St. Roy probably has something to do with this as well.
 |
| Research will probably look something like this... |
PS. I am pretty sure Chris and Peter are in cahoots. Kind of the ebb and flow of the hand tool world. They pretend as though they butt heads, but really they are masterminding the greatest renaissance since....well the renaissance. St. Roy probably has something to do with this as well.
Thursday, September 5, 2013
I won't tell if you won't tell
So the other week at the museum we cheated a little bit on our material preparation. We have a prolific palisade project (alliteration not intended...but intended) over the summer with a very definite deadline and as a result we have been hewing posts and splitting pale like madmen. Our total goal is 27 hand hewn posts, 33 sawn rails, and about 400 pieces of pale. On top of these staggering numbers we are also one carpenter down (no worries, no one was hurt) so the rest of us are picking up the slack.
The best part of the whole day, was that the "waste" from the band sawing were some pretty decent slabs of white oak, some of which were upwards of 4" x 10" in cross section.
So as any self respecting hand tool enthusiast would do, I grabbed a chainsaw and some Elmer's glue and stickered up this "scrap" to set aside and dry...for the next three years...in hopes that I can build a bench...as long as it doesn't check...or warp...or...well you get my point.
Along with the slabs of oak we had a whole bunch of really big 12 foot long flitches from the outsides of the logs...but that is a story for a different time!
 |
| This is our running tally of logs hewn and logs split...we are getting there! |
As a result of this massive material manufacturing marathon (see what I did there) we have little time to learn pit sawing and even less time to actually pit saw all of the rails that we will need for the project. Enter the band saw mill! It does pain my heart a little bit to see band sawn rails going into the project after so much sweat has been put into traditional techniques, but sometimes economy outweighs authenticity. Luckily the band saw mill was one of the coolest pieces of machinery that I have ever seen (GASP! That isn't very woodwright sounding).
 |
| Nothing miserly about this rig, Bob the owner really knows what he is doing. |
This bad boy could take logs over 24" in diameter and spit out slabs of any size. It lifts the logs into place, rotates them into the correct orientation, adjusts the table to compensate for tapering at the bell, and clamps the piece firmly for sawing...hell I am sure it probably makes your lunch if you have the right attachment.
We were aiming for 3-1/2" x 5-1/2" for our rails, so we had to start with some pretty massive slabs around 15"x6" (eat your heart out Mr. Schwarz and Monsieur Roubo).
 |
| Some finished rails...so maybe it is a little easier than pit sawing |
We were aiming for 3-1/2" x 5-1/2" for our rails, so we had to start with some pretty massive slabs around 15"x6" (eat your heart out Mr. Schwarz and Monsieur Roubo).
 |
| If only we could have stopped here...and opened a workbench building business. |
Some of the white oak we were sawing was absolutely gorgeous, and we joked that it was a crime that we were sawing it up just to rot away on a fence that would be keeping away imaginary Narragansett's.
 |
| Absolute gorgeous grain. |
The best part of the whole day, was that the "waste" from the band sawing were some pretty decent slabs of white oak, some of which were upwards of 4" x 10" in cross section.
 |
| The slab laying aside is the "Scrap" |
So as any self respecting hand tool enthusiast would do, I grabbed a chainsaw and some Elmer's glue and stickered up this "scrap" to set aside and dry...for the next three years...in hopes that I can build a bench...as long as it doesn't check...or warp...or...well you get my point.
 |
| All stickered up...I should probably go do something while this dries |
Along with the slabs of oak we had a whole bunch of really big 12 foot long flitches from the outsides of the logs...but that is a story for a different time!
Monday, August 26, 2013
Rumors of my Demise Have been Greatly Exaggerated!
It has been a while since my last post, so I figured I would share an update and some pictures to show what I have been working on. Since starting my new job, I have been expanding my hand woodworking skills at an alarming rate. Helving axes, making mallets, fixing beetles, splitting pale, hewing logs, and a whole other slew of incredibly useful skills (relative term according to The Boss) for a self proclaimed woodwright!
I wont go over everything that I have been up to in this post...that would ruin all of my great material, plus I think the long-windedness (awesome new word) of a post like that would scare away any potential readers. I will however share the first completed project that I did as a 17th century carpenter.
We were making a new goat pasture so naturally we needed a garden gate to get in and out of the pen. I started with a huge oak log and split, rived, trimmed, and smoothed my way to reasonably flat and straight lumber. Green woodworking really is a beast of a different color, and it is great fun trying out new skills that have been essentially extinct for at least a hundred years or so. The gate was assembled using hand wrought nails and a method called clenching...which is basically a way to bend nails on purpose. Another important note is that everything is done using traditional 17th century vernacular, so before making this gate I went and did some research into paintings, engravings, woodcuts, and written documentation on the appearance and construction of garden gates (it seems a little bit overkill when I write it out).
Another adventure I had very quickly at my new position was going to see Mr. Schwarz himself give a talk on the history of tool chests. We hosted the Early American Industries Association for a day, and in return we were able to attend their conference down in Hyannis. Most of the material was taken from The Anarchist Tool Chest, so I was familiar with it, but there was some additional pictures and information not included in the book, most notably some stunning sneak peak photos of the H.O. Studly tool chest (Google it if you have never seen it...you're welcome).
I have a ridiculous amount of photos and stories that I have been accumulating in the last three months, so check back often as I am planning on clearing up my backlog and returning to boring you all to death with erroneous details.
I wont go over everything that I have been up to in this post...that would ruin all of my great material, plus I think the long-windedness (awesome new word) of a post like that would scare away any potential readers. I will however share the first completed project that I did as a 17th century carpenter.
We were making a new goat pasture so naturally we needed a garden gate to get in and out of the pen. I started with a huge oak log and split, rived, trimmed, and smoothed my way to reasonably flat and straight lumber. Green woodworking really is a beast of a different color, and it is great fun trying out new skills that have been essentially extinct for at least a hundred years or so. The gate was assembled using hand wrought nails and a method called clenching...which is basically a way to bend nails on purpose. Another important note is that everything is done using traditional 17th century vernacular, so before making this gate I went and did some research into paintings, engravings, woodcuts, and written documentation on the appearance and construction of garden gates (it seems a little bit overkill when I write it out).
 |
| A garden gate with riven oak and clenched nails. That should keep the goats at bay! |
Another adventure I had very quickly at my new position was going to see Mr. Schwarz himself give a talk on the history of tool chests. We hosted the Early American Industries Association for a day, and in return we were able to attend their conference down in Hyannis. Most of the material was taken from The Anarchist Tool Chest, so I was familiar with it, but there was some additional pictures and information not included in the book, most notably some stunning sneak peak photos of the H.O. Studly tool chest (Google it if you have never seen it...you're welcome).
 |
| Chris Schwarz in the flesh ladies and gentlemen. |
I have a ridiculous amount of photos and stories that I have been accumulating in the last three months, so check back often as I am planning on clearing up my backlog and returning to boring you all to death with erroneous details.
Thursday, June 6, 2013
Wood Finishes for Tree Huggers
I am a hippy in hiding. I obsessively organize recyclables, buy organic food, use natural body products, avoid chemical cleaners, and the list goes on and on. As an extension to my obsession with "All-Natural" I have been on a hunt for the best possible wood finishes without compromising Mother Nature and my health. At the same time I don't want to sacrifice the overall beauty and durability of the projects that I work so long and hard over.
My first real dilemma with natural finishes came when I started making wood cutting boards as presents for my family members. I agonized over how to protect the wood without simultaneously poisoning them and their dinner guests. Using my favorite interweb algorithm I found a great recipe for a cutting board finish made with pharmacy grade mineral oil and natural beeswax. Mineral oil and beeswax are used for a whole host of internal and external personal care products so they are perfect candidates for a natural, food safe wood finish.
So here is the super-duper secret recipe. Heat the mineral oil and add the beeswax until it melts. Yup, it is that simple. The ratios are really dependent on your preferences, add more wax for a stiffer buffing paste, or more oil for a milky rubbing lotion. I personally like an oil to wax ratio of 3 to 1. This allows a nice creamy paste when the finish is cold, and I feel that it seeps into the wood when I let it sit for a while.
 |
| Cutting Board Blanks Fresh from the Planer |
So here is the super-duper secret recipe. Heat the mineral oil and add the beeswax until it melts. Yup, it is that simple. The ratios are really dependent on your preferences, add more wax for a stiffer buffing paste, or more oil for a milky rubbing lotion. I personally like an oil to wax ratio of 3 to 1. This allows a nice creamy paste when the finish is cold, and I feel that it seeps into the wood when I let it sit for a while.
 |
| A Whole Lot of Boards after Raising the Grain with Water |
Applying this paste is as easy as making it. There are no crazy rules like modern high tech finishes, "Apply to a clean hypoallergenic surface that has been blessed by a Rabbi, let sit for 2 minutes and 37 seconds, then immediately wipe off with a mixture consisting of 21/32nds mineral spirits and 11/32nds turpentine, then re-apply within 79 minutes or after 9-1/2 weeks, but only on Sundays and Thursdays, or the second Friday of every lunar cycle!'...well you get my point. Simply slop it on the wood, let stand for 30 minutes (or 30 hours for all I care), and then buff it off with a clean rag. I promise you will have a great looking, velvety, safe for food finish that cost less than $5 for 16 oz.
 |
| A Finished Cutting Board being put to the test making Omelets. |
What about the cons you ask? Let me explain some of my perceived disadvantages.
Is this the most durable finish? No, it has to be reapplied every once and a while when the wood seems to be drying out.
Is it the most Eco-friendly solution? Most mineral oils are a byproduct of petroleum refineries, and the fact still remains that petroleum<organics.
Does it contain any VOCs? Only if you consider the smell of warm honey a VOC.
So overall I would say that the mineral oil/beeswax finish is far better than most salad bowl finishes or polyurethanes, but not as environmentally sound as an all natural oil. But for the time being I can fall asleep at night knowing that all of the recipients of my hand made waddayacallits don't have to worry about toxic solvents and chemicals tainting the beauty and enjoyment of the wood.
PS I wrote this post about six months ago...but somehow it got lost in the pipeline...alls well that ends well right?
Friday, May 31, 2013
Poliss-what Redux
As a way to fuel my obsession with woodworking, and in an attempt to offset my tool budget, I make and sell laminated cutting boards. Generally I just wipe on and wipe off my homemade super secret (not really) oil/wax finish. This produces a velvety surface that is very impressive when clients receive their cutting boards, but I find the finish generally lacking in the longevity department. I always provide a can of the wax paste for routine maintenance, but I am continually looking for ways to improve the quality and utility of my products. A while back I purchased several Polissoirs from Don Williams to try my hand at some traditional wax finishing techniques. After months of procrastinating, I finally put 'em to work.
To start out I melted down the oil and wax, lathered on a nice thick coat, and let it absorb into the wood for ten to fifteen minutes. Next, I dipped the Polissoir into the liquid wax, allowing the end of the straw to absorb the finish.
 |
| Marinating the Polissoir...I am not sure this was necessary. |
I began burnishing the surface of the cutting boards using broad, quick strokes along the long grain of the wood. The wax had partially solidified on the surface of the wood, which provided a great...slurry?...with which to work into the pores of the wood. It was amazing how much wax I could burnish into the cutting boards.
 |
| Starting with a forwards-backwards stroke, speed and pressure seem to be important. |
After the initial burnishing, the thin layer of wax had been completely absorbed. As a result I added some more wax, and burnished the surface again until it seemed that the surface was slick and the wax was no longer being absorbed. Notice I switched hands on the second round, this technique is tiring!
 |
| Half way through I switched to a side to side motion, still going along the long grain. |
When my arm finally gave out I wiped the excess wax off and buffed the cutting board with a soft cotton rag. The finish was absolutely amazing. Instead of a velvety, delicate feel the cutting board was hard, shiny, and felt incredibly solid. Even The Boss said that it gave the boards a solid professional feel that they were lacking originally (kind of a back handed compliment if you ask me). I am hopeful that this finish will be much more robust in use, and I have made myself yet another cutting board to compare to my original finishing technique.
All in all I am incredibly impressed with the Polissoir, and I can't wait to try out various other techniques on more intricate works. Plus I always like to add another technique into my bag of tricks!
Thursday, May 23, 2013
Curse You Internet!
 |
| The casting is clean, and Hock Tools has teamed up to make an Iron for the kit. |
PS. I am starting to think I should rename my blog to "The Clueless Iron Monger"...but it just doesn't have the same ring to it.
Sunday, May 19, 2013
Too Many Tools, Too Little Time
For my birthday I received several awesome gifts from my very supportive friends and family. I asked for a set of joinery backsaws (dovetail and sash) and they delivered.
PPS. As you can see from the photographs these tools came from Tools for Working Wood and their Gramercy Tool Line. This is my favorite hand tool company and I can't recommend them enough."
 |
| Looks like I will be practicing my saw wright skills in the future. |
The only problem is that none of them have handles!!! Luckily my in-laws also got me a handle maker's rasp (I must talk way too much about my hobby at parties). Unfortunately I am starting my new job as a Plimoth Plantation Artisan, so I am extremely limited in time. This means that I will have to put off handle making for some time, or use the saws handleless getting my greasy mitts all over the nice bright blades.
 |
| Hand Stitched rasp made specially for shaping totes. It is toothed on the curved side and smooth on the back. |
PS. I am very lucky that my job as a hand tool carpenter is getting in the way of my hobby of hand tool furniture construction, I guess I can't really complain.
PPS. As you can see from the photographs these tools came from Tools for Working Wood and their Gramercy Tool Line. This is my favorite hand tool company and I can't recommend them enough."
Friday, May 10, 2013
Bitter Sweet
Today was the last day at my current job as a carpenter. It was a bitter sweet day, I am not leaving because I hated my job, or it wasn't paying enough, but rather to follow my passion of hand tool woodworking. Starting on Monday I will be an Historic Arts and Trades Artisan at Plimoth Plantation. This is truly an amazing opportunity, but it does mean that I had to leave my current position at a company that I truly enjoyed.

As a going away present, one of my coworkers gave me an old wooden fore plane. He hoped that I might be able to use it at my new position. It is truly a beautiful tool, and it seems to be a fine worker (once the iron gets a good honing). I am anxious to put it to wood...but unfortunately I am starting the new job, commuting much farther than normal, fixing up the house to put on the market, and doing all the other normal stuff that goes with life, so I am very short on time. In the meantime it will serve as a badass knick knack, and a reminder of the great company and group of guys that I used to work for.

As a going away present, one of my coworkers gave me an old wooden fore plane. He hoped that I might be able to use it at my new position. It is truly a beautiful tool, and it seems to be a fine worker (once the iron gets a good honing). I am anxious to put it to wood...but unfortunately I am starting the new job, commuting much farther than normal, fixing up the house to put on the market, and doing all the other normal stuff that goes with life, so I am very short on time. In the meantime it will serve as a badass knick knack, and a reminder of the great company and group of guys that I used to work for.
Wednesday, April 17, 2013
The Gettin' Was Good
I know that all of you have been anxiously waiting by your computers to find out what tools I got from my excursion to the Hollis Flea Market on my birthday (cue the crickets), so without further adieu, here is a list of what I picked up.
Starting from left to right. The larger handsaw is a Disston D8 in remarkable condition. It has the two handed grip (with the thumb hole) and both horns are intact. The tote is stamped with patent dates, the latest being Nov 18 1879. This places the saw approximately from the early 1880's as Disston was "fiercely protective" of their patents during this time period. The blade is 26" at the toothline, and is filed to an aggressive 7ppi rip pattern with a skewed back. The etch is still clearly visible and the blade seems to have only minor surface rust (although a good cleaning will tell for sure). There is one tooth broken off about 2/3 of the way towards the tote, but I will probably leave this be as long as it doesn't cause major problems after sharpening. There is a gentle bow to the blade, which from my understanding is the result of being sharpened on a machine.
Price $25
The next saw is another Disston D8. This saw has a 20" skew back blade with a 10ppi crosscut filing. The tote has broken horns, but they have been sanded smooth and refinished. The tote is missing the lowest saw nut, and as a result has a little bit of slop (hopefully a replacement nut will take care of this). Based on the medallion and the etch on the blade I have dated this saw from approximately 1940-1947. There is very little surface rust on the blade, and the teeth are in good shape.
Price $8
Moving along is the small Disston back saw. I have little info on this saw, and it probably wont be usable. It has a 10" blade filed to 14ppi crosscut and a steel back. The handle is a little loose, and the blade has a noticeable kink at the toe. I purchased it because it was cheap and I figured I could use it to practice my saw doctoring skills. As a bonus The Boss said it was "so cute" that we could hang it up for decoration if it was un-salvageable (see True Love).
Price $10
The next tool that I found (after many a flea market and antique store search) was a simple 9-1/2 Stanley block plane. For one of the most common planes EVER made, this little guy was surprisingly difficult to find. I search every time I go anywhere, and what I generally find are cheap Stanley knock offs, over rusted pieces of scrap metal, or planes that have been so well loved they aren't square, flat, smooth, usable, or worth a penny. With that being said, I was thrilled to have found this little guy.
The iron is in surprisingly good shape, needing only a good honing. The adjustable mouth was seized with rust, but after opening it up it seems a good cleaning and lapping should make it move smoothly. The selling point of this block plane was the condition of its throat. Everything was crisp and strait, just like it was from the factory. The sole of the plane is also in great shape, only having superficial rust.
Price $10
The barrel in the picture is an old nail keg I found at an antique store down the street from the flea market. Not much to say about this, other than I got it as a great replacement for a plastic barrel in my shop. The price was right and it looks much nicer in the corner. I have seen these go for upwards of $70 on ebay.
Price $27
EXTRA PICTURE BONUS!!!
The coup-de-gras of the whole day was hidden under some old paperback books strewn out on a blanket. The dealer didn't even know what it was, and definitely didn't know what it was worth. But as soon as he told me the price I couldn't throw my money at him fast enough. It is a really nice pair of 6" dividers, cast steel, with a friction joint hinge. These are very similar to my favorite set of dividers (what? you don't have favorite dividers?!?!?!) originally shown to us by Joseph Moxon himself. But as apposed to the $125 reproductions made by blacksmith Peter Ross the price was just right.
Price $1
Overall I am thrilled with my luck for my birthday. Overall I spent $81, but I think I took home way more than $81 worth of tools.
 |
| A healthy days take! |
Starting from left to right. The larger handsaw is a Disston D8 in remarkable condition. It has the two handed grip (with the thumb hole) and both horns are intact. The tote is stamped with patent dates, the latest being Nov 18 1879. This places the saw approximately from the early 1880's as Disston was "fiercely protective" of their patents during this time period. The blade is 26" at the toothline, and is filed to an aggressive 7ppi rip pattern with a skewed back. The etch is still clearly visible and the blade seems to have only minor surface rust (although a good cleaning will tell for sure). There is one tooth broken off about 2/3 of the way towards the tote, but I will probably leave this be as long as it doesn't cause major problems after sharpening. There is a gentle bow to the blade, which from my understanding is the result of being sharpened on a machine.
Price $25
 |
| A close up of Disston's patent wars. |
The next saw is another Disston D8. This saw has a 20" skew back blade with a 10ppi crosscut filing. The tote has broken horns, but they have been sanded smooth and refinished. The tote is missing the lowest saw nut, and as a result has a little bit of slop (hopefully a replacement nut will take care of this). Based on the medallion and the etch on the blade I have dated this saw from approximately 1940-1947. There is very little surface rust on the blade, and the teeth are in good shape.
Price $8
Moving along is the small Disston back saw. I have little info on this saw, and it probably wont be usable. It has a 10" blade filed to 14ppi crosscut and a steel back. The handle is a little loose, and the blade has a noticeable kink at the toe. I purchased it because it was cheap and I figured I could use it to practice my saw doctoring skills. As a bonus The Boss said it was "so cute" that we could hang it up for decoration if it was un-salvageable (see True Love).
Price $10
 |
| A "Warranted Superior" Medallion Generally means a Lower Quality Saw |
The next tool that I found (after many a flea market and antique store search) was a simple 9-1/2 Stanley block plane. For one of the most common planes EVER made, this little guy was surprisingly difficult to find. I search every time I go anywhere, and what I generally find are cheap Stanley knock offs, over rusted pieces of scrap metal, or planes that have been so well loved they aren't square, flat, smooth, usable, or worth a penny. With that being said, I was thrilled to have found this little guy.
 |
| A 9-1/2 disassembled. After some love this will be put to hard work. |
The iron is in surprisingly good shape, needing only a good honing. The adjustable mouth was seized with rust, but after opening it up it seems a good cleaning and lapping should make it move smoothly. The selling point of this block plane was the condition of its throat. Everything was crisp and strait, just like it was from the factory. The sole of the plane is also in great shape, only having superficial rust.
Price $10
 |
| The movable toe should be an easy fix with some cleaning and oiling. |
The barrel in the picture is an old nail keg I found at an antique store down the street from the flea market. Not much to say about this, other than I got it as a great replacement for a plastic barrel in my shop. The price was right and it looks much nicer in the corner. I have seen these go for upwards of $70 on ebay.
Price $27
EXTRA PICTURE BONUS!!!
The coup-de-gras of the whole day was hidden under some old paperback books strewn out on a blanket. The dealer didn't even know what it was, and definitely didn't know what it was worth. But as soon as he told me the price I couldn't throw my money at him fast enough. It is a really nice pair of 6" dividers, cast steel, with a friction joint hinge. These are very similar to my favorite set of dividers (what? you don't have favorite dividers?!?!?!) originally shown to us by Joseph Moxon himself. But as apposed to the $125 reproductions made by blacksmith Peter Ross the price was just right.
Price $1
 |
| Not quite as handsome as Moxon's, but you can't beat the price. |
Overall I am thrilled with my luck for my birthday. Overall I spent $81, but I think I took home way more than $81 worth of tools.
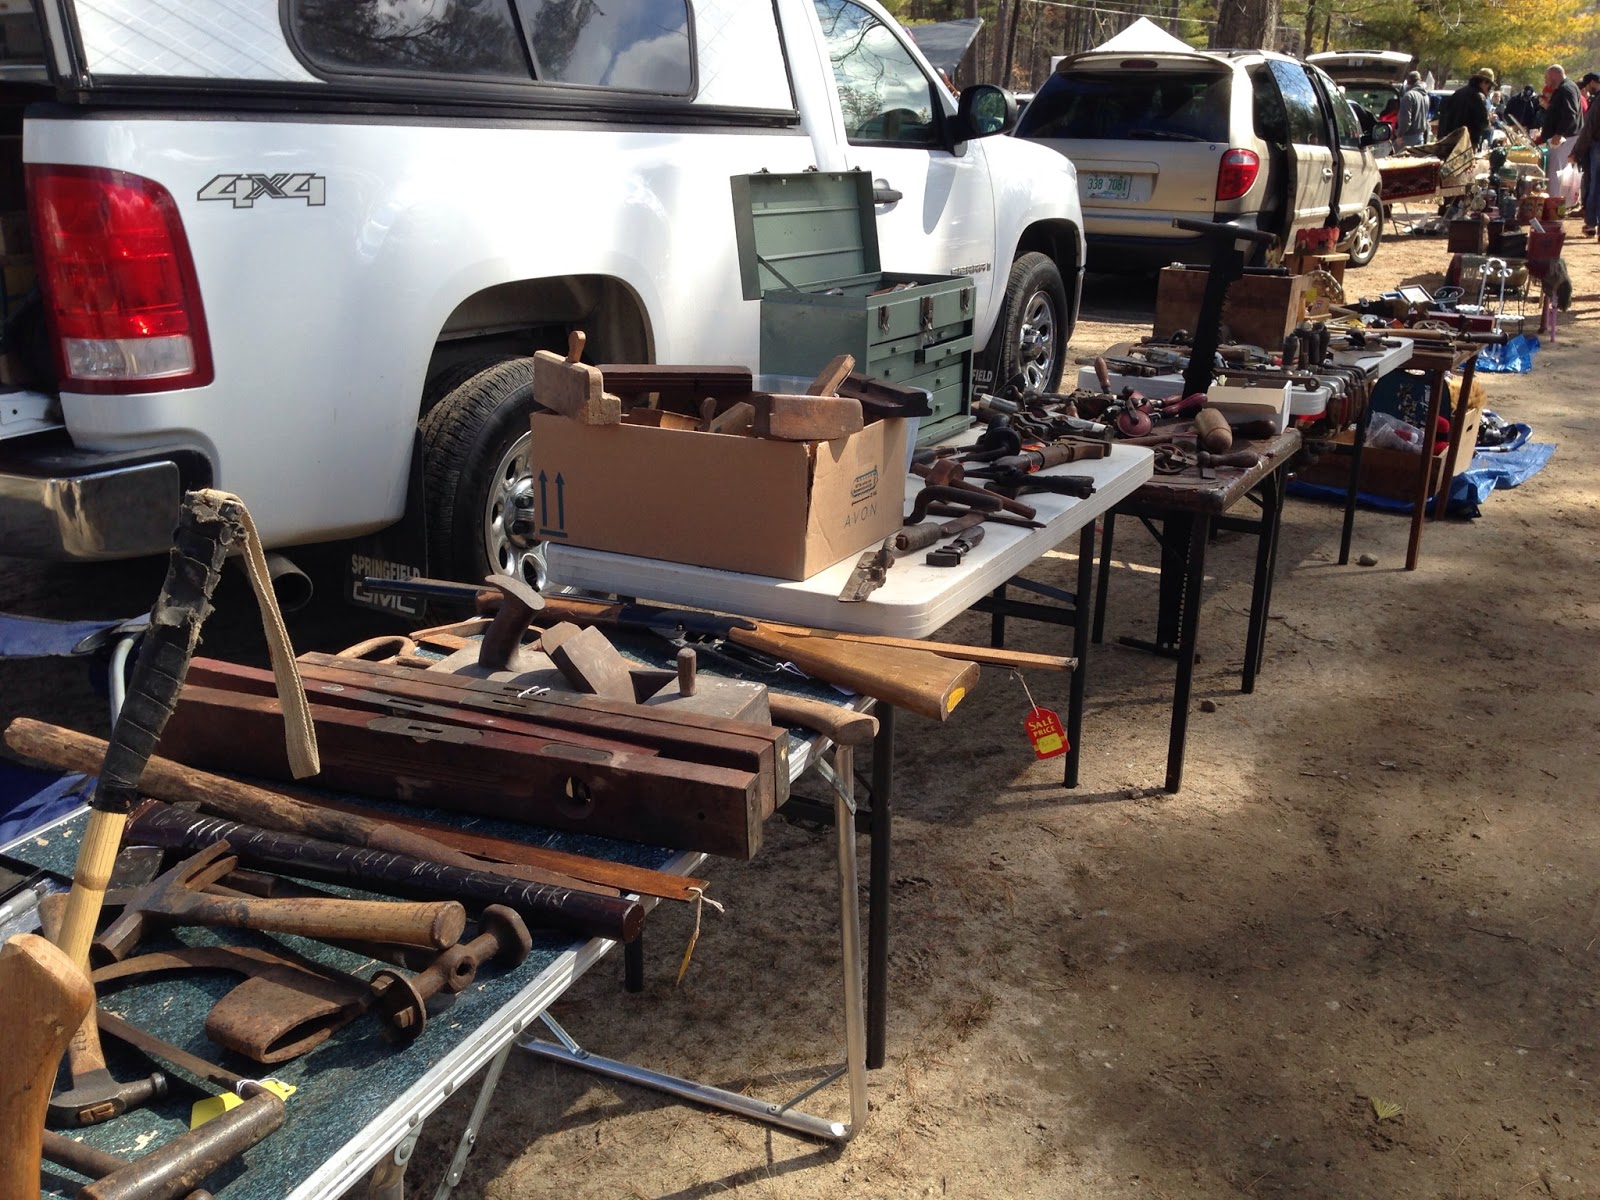
Sunday, April 14, 2013
True Love
So today is my birthday, and I have to say that I have THE BEST wife in the entire world! Instead of trying to arrange some big ostentatious dinner that costs her (and by extension me) hundreds and hundreds of dollars, The Boss knows what truly makes me tick and brought me to the Hollis Flea Market.
There were several dealers that dealt exclusively in antique hand tools, and many more that had a decent selection of tools on top of their normal wares. There was so much good stuff that I actually passed on a couple really good planes and saws, simply because there were even better options available.
I will have a follow-up post showing some of the sweet stuff that I got, but to anyone within driving distance I would highly recommend making it out to Hollis sometime (I promise you won't regret it). As a plus it is a good test to tell whether or not you have true love with your significant other; because lets face it, there is no other way to describe the patience someone has when you are geeking out over old, rusty, rotten pieces of iron and wood that most people would throw out with the garbage.
PS Head over to my new page to see some great places to find old tools in the New England area!
 |
| This dealer is there almost every week, and he never disappoints! |
It just so happened that it was opening day for the 2013 season, and everyone who's anyone knows that this is the best chance to find all of the primo stuff the dealers have been hoarding and collecting all winter long. And boy did they deliver!
 |
| By far the biggest trammel point I have ever seen. |
 |
The smallest eggbeater drill ever?
|
There were several dealers that dealt exclusively in antique hand tools, and many more that had a decent selection of tools on top of their normal wares. There was so much good stuff that I actually passed on a couple really good planes and saws, simply because there were even better options available.
 |
| A new dealer I had never seen before. He had really unique tools, and yes that is a whole box full of wooden planes. |
I will have a follow-up post showing some of the sweet stuff that I got, but to anyone within driving distance I would highly recommend making it out to Hollis sometime (I promise you won't regret it). As a plus it is a good test to tell whether or not you have true love with your significant other; because lets face it, there is no other way to describe the patience someone has when you are geeking out over old, rusty, rotten pieces of iron and wood that most people would throw out with the garbage.
PS Head over to my new page to see some great places to find old tools in the New England area!
Tuesday, March 26, 2013
Old Tool Mecca
I was recently in touch with an acquaintance from high school who informed me that he was also interested in hand tools, particularly for boat building. Through some back and forth messages he directed me to Liberty Tool Co which is an antique tool store dealing almost exclusively in used woodworking, black smithing, and mechanics tools. This is the kind of place that I have been searching for during my antiquing on the weekends, and it is just too much of a gem to keep to myself.
I found this video online which sums up how incredible this place really is. I encourage anyone in the New England area, or anyone visiting, to stop by this hidden treasure (it is within driving distance from Lie-Nielsen Toolworks so double trouble!). Happy rust hunting!
UPDATE: It has come to my attention that the video may not play on some popular mobile browsers. I don't have a good fix for this so you can simply follow this Link to the video on Vimeo.
Saturday, March 23, 2013
Blue Spruce Marking Knife
Although I do not have an abundance of money, I believe in the "buy your last tool first" philosophy (see contradiction here). When I was deciding which marking knife I wanted to buy, I found a great independent tool maker, David Jeske, who owns and runs Blue Spruce Tool Works. His marking knives come highly recommended throughout the hand tool blogosphere, so I figured that I would buy the small marking knife...with a special piece of wood for the handle.
I had some holly wood (insert witty movie star joke here) that I was saving for the right project and figured my one and only marking knife would be the perfect candidate for such nice wood. So I contacted David Jeske to ask about the use of holly as a handle material. David was more than helpful with my questions and even went into some details about the finishing processes that he uses for his tools and how they hold up in use. After discussing the details through several emails I dropped my piece of holly in the mail and anxiously checked my mailbox morning and night. Within two weeks, pretty amazing for a custom handmade knife, I received an awesome little cardboard box in the mail from Oregon.
When I opened the box I was immediately impressed by the quality of my marking knife; other people's reviews didn't even begin to do David's work justice. The blade was bright, the ferrule had a lustrous brushed look and the handle, well the hand-rubbed lacquered holly handle looked and felt like polished ivory. DISCLAIMER: No Woolly Mammoths were exhumed for the making of my marking knife.
Since receiving the marking knife, I have had several projects which I have used it on. The handle fits my hand perfectly and the knife is crisp and sharp, severing the wood fibers for a nice clean line. I am very pleased with how well the knife feels and tracks in a mark. Making things by hand is a deeply personal matter and the tools one uses to do so are just as personal. I have no doubt that I will get to know this small knife very well throughout my journey of hand joinery.
 |
| Truly a work of art. |
I had some holly wood (insert witty movie star joke here) that I was saving for the right project and figured my one and only marking knife would be the perfect candidate for such nice wood. So I contacted David Jeske to ask about the use of holly as a handle material. David was more than helpful with my questions and even went into some details about the finishing processes that he uses for his tools and how they hold up in use. After discussing the details through several emails I dropped my piece of holly in the mail and anxiously checked my mailbox morning and night. Within two weeks, pretty amazing for a custom handmade knife, I received an awesome little cardboard box in the mail from Oregon.
 |
| A detail of the intricate turning. |
When I opened the box I was immediately impressed by the quality of my marking knife; other people's reviews didn't even begin to do David's work justice. The blade was bright, the ferrule had a lustrous brushed look and the handle, well the hand-rubbed lacquered holly handle looked and felt like polished ivory. DISCLAIMER: No Woolly Mammoths were exhumed for the making of my marking knife.
 |
| Detail of the two part ferrule and perfectly formed handle. |
Since receiving the marking knife, I have had several projects which I have used it on. The handle fits my hand perfectly and the knife is crisp and sharp, severing the wood fibers for a nice clean line. I am very pleased with how well the knife feels and tracks in a mark. Making things by hand is a deeply personal matter and the tools one uses to do so are just as personal. I have no doubt that I will get to know this small knife very well throughout my journey of hand joinery.
 |
| Tools of the trade. |
Subscribe to:
Posts (Atom)