Tuesday, June 17, 2014

Woodwright Workout

Seeing as I am an overambitious, yet obessively compulsive, woodworker I recently found myself in an uphill battle with a massive slab of oak. The bench in the shop at work has been used and abused for as long as I have been alive. Word on the street is that it hasn't even been flattened since it was first built...so I took the liberty of flattening it myself.

20+ years of grime, sweat, and I am pretty sure some blood.

I started going transversely with the grain with a flat iron and things were going well, that was until I reached the far left hand side of the bench, which has been used as the sharpening station for quite a while. All that oil, metal particles, sandpaper grit, rust, and god knows what else really sunk into the wood because after five strokes my iron was dull as a doorknob.

Windows open with a nice cooling breeze, I can think of a lot worse things to be doing.

Switching to a heavily chambered iron sped things up considerably, and even when the iron dulled, the heavy chamber helped to muscle through with the initial planing. After one pass I switched to 45 degrees with the grain, pushing the plane body at a skewed angle helped slice through some of the rough grain and knots.

Getting a bit closer, you can see the scalloped track marks from the last flattening.

I finished up going with the grain (as best I could) and planing the front of the bench to be square with the top. Overall it was an exhausting project...most people aren't stupid enough to flatten a knotty, old, 16 FOOT!!! workbench their first time around the block, but I am just the right kind of stupid.

There is still plenty of character in this bench, but now you can use it reliably to try boards!

So if you are ever looking for a new workout routine, I would recommend going into the massive workbench flattening business.

My workhorse plane, I might follow up with a longer jointer in the future, but I am not sure it is necessary.

PS. I am just being melodramatic...it really only took about two hours and one sweaty t-shirt, and that included re-honing my iron twice.


Tuesday, April 22, 2014

Biddle?

Leave it to the 17th century to vernacularize (new word?) thatching tools. During my research of what we needed to thatch one of the houses in the village I first found that a biddle was a thatching ladder that hooks into the roof. This was all well and good...that was until I found that certain groups of people also called the paddle used for beating the thatch a biddle. Most of you will know this tool as a Legget, if you know it at all. Further still I have seen one source referring to this paddle as a Dutchman, referring to the Netherlandic (another new word?) pattern used.

This is half the problem doing research on work-ways in the period. Everyone calls similar items by different names, and even worse, different items by similar names. If that isn't enough, even when you know the name for something you might not spell it the same as they did back in the day.

For instance, I have seen these thatching paddles called: paddles, battles, liggets, dressers, baddles, biddles, leggets, beetles, bats, and...yes...even Dutchman. On a side note, beetles are also large wooden mallets used for splitting pale and persuading timbers, leading to an even more convoluted set of tool terms.

This is all academic minutiae of coarse and the only thing that matters is that leggets are very real things, even if they do exist in two places at one time. On to the build!

To start off, I found a white oak crook with just the right proportions and angles. Five minutes at the shaving mare and I had a very respectable looking handle. I also took a nice clear pine log (possibly Eastern White, but I can't be sure) and split it up to make a rough bolt. Five more minutes with a hatchet and I had a reasonably flat and square hewn board. Good enough for me!

The blank pieces before any joinery. Saw, hatchet, and draw knife.

The geometry of a legget is pretty simple, step off the board into equal segments, scribe parallel lines, and then mark the end grain with 45 degree angles. Next it was as simple as letting in the lines with a rip saw and paring the waste using a sharp chisel. I used a flat sided firmer chisel just to see if I could use the tools a farmer-carpenter might have available, but a bevel edged paring chisel would have made the whole thing a breeze.

Half way done, using my new carpenters bench...but that is a different story

After establishing the ribs on the front, I flipped the board over and scribed the handle onto the back to make a socket. This is real rough work...but also real precise work. It needs to fit as snug as possible so it stays tight after lots of abuse, but it is a tricky irregular notch, so there is room for some wiggle, I just used my judgement and a small 3/4" chisel.

The X was scribed on the back to find the center. The handle was placed by eye.

Finally was clenching the paddle onto the handle. I have the distinct advantage of working with two great blacksmiths, so I had hand made wrought iron nails to use. If you wanted to do something like this, or have another project in mind, the museum's blacksmith Mattheo does some great commission work, so check out his shop!

The handle and paddle joined.

I used four long nails that I clenched in alternating directions which will hopefully lend strength to the connection. The fifth nail was driven at a slight angle into the handle. Don't ask me why I did this...it just seemed like a good idea at the time.

Some selective carving was done to allow for flat faces for the nail heads.

We only have two sizes of wimble and bits at the museum, nail and spike. Turns out the nail bit is slightly larger than the nails, as it should be when installing pale and clapboards, but it was a little looser than I would have liked on this project. Luckily I alternated the holes, and these wrought iron nails are great for clenching, so I feel like I got a nice strong connection.

This tool has a simplistic beauty that is unmistakable.

By May this legget should have one thatched roof and several cap repairs under its belt, so I will have to give a status report then. Overall I am really happy with the result, it feels super stable, has a great sweep to the handle, and is probably the most work-manly thing I have made to date. Total build time was about 4 hours from log to legget.

Did the settlers care about ergonomics, because this legget has it in spades!

Saturday, April 12, 2014

A Silk Hat

A very talented carpenter that I worked with at my previous job had a saying that he liked to use on not-so-high end projects:

"If you put a silk hat on a pig, it's still a pig."

I always enjoyed this statement, and was reminded of it when I was working on my hook knife recently. As I have touched upon previously I have become addicted to spoon carving. It is a maddeningly complex skill set that at first glance appears to be stupid simple. I bought the most inexpensive set of knives I could find because I am cheap (or poor). The straight knife I got works like a champ but the hook knife cuts like, for the sake of my anecdote, a pig.

Original profile with hard, blunt bevels.


Seeing as I am an obsessively compulsive nut bag I took it upon myself to see if I could make a silk hat, and turn this $17 knife cut like an $80 knife. First I took a file to the blade...this was a bad idea and ruined a perfectly good 8" mill file (I guess these knives are hardened fairly well). So my second attempt took me to the sandstone grinding wheel I have at work. This was really slow, but very effective.

Next was sanding, sanding, and more sanding. I started at 120 grit, and then progressed up through 220, 320, 400, 600, and 1000 (did I mention how compulsive I am?). I used a block of wood on the back of the knife, and then wrapped the sandpaper around a dowel for the inside surface. Finally, I stroped with a little bit of rouge polish and leather mounted on a block of wood to normalize and polish the edge.

Polishing the blade really makes the maker's mark pop.


I should have sanded more, if you can believe it, but the edge is fantastic. I might do some work to make the whole surface polished like the really nice hook knives I have seen from makers like Pinewood Forge, Hans Karlsson, and Svante Djarv. It was a lot of work, about a weeks worth of lunch breaks, but it did greatly improve the overall smoothness of cut and sharpness of the knife. 

More polishing on the outside might cause less friction in the cut.

You can see that I ground into the ferrul by accident while re profiling on the sandstone...my OCD is getting the better of me and I might re-helve this knife with some apple, or beech, oooo or boxwood, or...calm down Jason, you have a problem.

Rouded profile makes for cleaner cuts

If you have time, or have already purchased this knife and are unhappy with its performance, I would recommend re-profiling, but if you have money just buy a high end knife. I have tried several of the knife makers I mentioned above thanks to Peter Follansbee, and I can say without a doubt my re-profiled knife is still a pig

Remember, you can't polish a piece of sh...or maybe you can.

Wednesday, April 9, 2014

Biddle

We are ramping up to thatch the new frame in the village, and to prepare I have been diligently researching the period tools necessary for traditional thatching. We will be thatching in the public eye, so authenticity is an absolute must. So first on the docket is the precursor (at least in my humble opinion) to the modern hook ladder used for slate roofing, the biddle.

Basically, a biddle is a short ladder with some iron hooks that pierce through the thatch and hook onto the lath on the roof. This gives a nice versatile working platform that you can move around at your leisure. I started with a bow of Sassafrass and hewed it on four sides. Working such a small piece of wood was a nice change of pace. I didn't even score to my line, just started hewing with a hatchet, and within the hour I had a relatively squarish timber.

I love the sweet smell of Sassafras while it is being worked

Next, I bored holes through the piece. I think I did every 12", but it is more important to be consistent than to hit an exact number. These holes will accommodate the rungs of the biddle, and are about 7/8" diameter. It is best to auger the holes before ripping the stiles apart, that way you don't have to bother with that shop math that always seems to go wrong to line up all the holes.

Two squares keep me boring plumb

Before the comments start flowing in, I know a screw auger is not 17th century accurate, but unlike the Brewster Chair, no one will know I used it because these are through holes. Sometimes efficiency trumps authenticity, especially when no one is the wiser (I think I just blew my cover).

Next was ripping the small timber into stiles. Luckily I learned the Tao of Saw Sharpening from the always helpful Saw Wright, Matt Cianci, so I had a newly sharpened rip saw waiting in the wings.

Using a wedge keeps the piece from pinching

This biddle will be used on roofs up to 30 ft in the air, so I wanted it to be as robust as possible. This lead me to put mortised rails on the top and bottom to hold the whole thing together. I chiseled the mortises with a 3/4" chisel, and cut the tenons to fit.

It is easier to fit the tenon to the chisel, than fit the chisel to the tenon

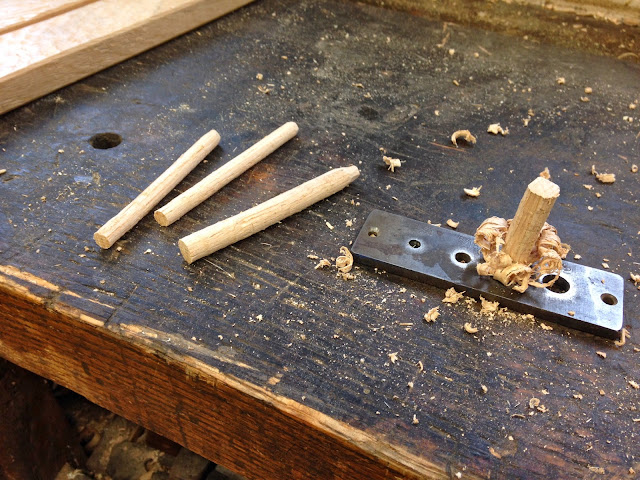
Keeping with the "I don't want to fall off the roof and die" mentality I also draw bored the mortise and tenons for a nice tight assembly. For the pegs I used bone dry riven white oak and noisily banged it through a dowel plate.

Dog holes in the bench are perfect places for the pins to be blasted through the plate

Remember my note on screw augers above? Yeah...refer to that in regards to dowel plates.

In addition to the draw bores, I also made all of the rungs with stopped shoulders and tiny little wedges to secure them into the stiles. Note to self, there is a reason they didn't wedge ladder rungs...it makes construction about twice as long. Now all I needed was a mallet and earplugs to knock this bad boy together.

Tap, Tap, Tap

I got a little carried away knocking the whole assembly together and it fell right off the bench, but it didn't self destruct, so that is reason to be happy.

It is easy to get giddy when approaching the end of a new, exciting project

The last piece to be dealt with was making the tiniest stupidest through tenons I will probably cut in my life. These were for the iron hooks that our blacksmith made for me. The mortises were 3/16" x 3/4" and went through the whole 3-1/2" piece of Sassafrass, and they had a stepped shoulder to boot.

A tight fit now ensures a tight fit later

Clenching the biddle hooks is pretty much the same as clenching nails...except you use a sledge hammer and swing as hard as you can.

There is a fine line between clenching and splitting with these bad Larrys

Finally, I step back and admire my hard work, not bad if I do say so myself. Total hand tool construction, all the way from felling the tree with an axe. Next on the list of thatching tools is a biddle (that is not a typo...but it IS a story for another time).

I need to get The Boss to take better pictures for me...


Wednesday, March 26, 2014

17th Century Hatchets

Being that at least half of my carpentry work is done in front of the public in a 17th century context, it is essential that my tools are as historically accurate as possible. The big problem with this ideology is that historical tools from this era are a little bit hard (aka damn near impossible) to come by, and when we do find them, we try to preserve and study them rather than smash them against pieces of wood.

As a work around, the blacksmiths at the museum reprofile modern axes to better impersonate these actual historical artifacts. My new hatchet started its life as a Wetterlings broad axe (that's right, us badass pilgrims use broad axes as hatchets, but I digress).

Stock Wetterlings Short Handled Broad Axe #190

The pattern that my new hatchet is based on is from Martin's Hundred and dated to around 1621. It was found in the ground along with various other tools, most likely buried there to prevent the native populations from repurposing the metal into tools and weapons.

Archeologist's sketches of a Martin's Hundred hatchet

The Wetterlings head is hack sawn away to the same profile as the Martin's hatchet, removing a lot of the weight from behind the eye and reducing the bit length by several inches.

The hacked up head...luckily this was not my job

Next I reground the bit into a nice fair curve, filed it for a convex bevel, sharpened it with whetstones, and stroped with a piece of leather charged with rouge polish. Finally I helved the hatchet with a white oak handle (remember these are English settlers in 1627, they probably don't know the wonderful qualities of Hickory as handle stock).

The finished hatchet. I like a nice healthy fauns foot for power! 

Overall this is a beefy hatchet with one hell of a bite. You can see how thin the historic hatchet is right in front of the eye, but the Wetterlings is quite thick, giving it much more mass. After four hours of trimming lath, I appropriately nicknamed this hatchet "Wrist Breaker."

Check out all that iron in front of the eye.

In order to protect the edge, and lessen the amount of sharpening I need to do, I made a nice wooden blade guard (note that this is not historically based on anything).

An ash blade guard with some hemp rope to hold it on.


Sunday, March 2, 2014

Failure is not...not an Option

Those of you that have been following my blog for a while have noticed that I have had several cliff hangers that have not been addressed. I would like to blame these loose ends on relocating for my new job...but mostly it is because I am a lazy blogger. So here is my small peace offering for those that have been waiting anxiously (but not really) to find out how my basket weaving attempt ended.

Although I started well enough, things soon turned south as I went to start the sides of the basket. Before this debacle, however, I first collected some cherry shoots from my pseudo-coppice in the Alden House garden.

Two cherry faggots for the sides

The next order of business was to do some research. I found a couple of helpful articles and videos online that are worth taking a look at, even just for pure unadulterated curiosity. After picking up what I thought would be helpful tips I got back to work. I sharpened the spars, so they jam into the weavers better, and inserted 12 of them into my basket bottom.

Sharpened spars

In case you aren't familiar (like me) with basket weaving, 12 is a very poor number for spars. In order for the weavers to alternate over-under-over-under continually as you spiral around the basket you need an odd amount of spars...and through four years of mathematics and engineering I am almost positive 12 is not an odd number. Unfortunately I did not know this fact when I started this basket.

Once the spars are in, it was time to bend them to set the hard corner between the base and sides of the basket. I tried several methods to achieve this bend, and none of them worked very well. Boiling made the cherry brittle, bending without modification just fractured the stock, twisting while bending only rent the fibers asunder, so I found the best (out of the horrible solutions) was to cut a small notch through half the thickness of the shoots which helped reduce fracture. This is probably a good reason why you don't see a lot of cherry baskets.

Spars inserted and bent up the sides

Finally I started winding the weavers over-under-over-under-over-over; yup that even number of spars bit me in the ass.

Oh, and another good tip that I found AFTER botching this basket, is that you can reverse the direction of weaving when you start the sides, this reversal makes the basket stronger (don't ask me why).

As can be seen...the sides didn't shape up very well

After a couple hours of trying to weave the sides, unwind them, and try again, I finally surrendered and admitted to myself that this basket was not meant to be. Since this attempt I have done even more research, including videos, books, and blogs, and I have been looking into some basket weaving courses locally. Hopefully my next attempt will be a little more inspiring, but this is The Clueless Woodwright, not 'The Has Everything Figured Out Woodwright' (that just doesn't have the same ring).

Thursday, February 27, 2014

A flattering angle

Those in the know are aware that The Boss is a photographer. If you are not in the know you should go check out her site RIGHT NOW because my handsome mug is plastered all over her most recent post.

We were raising some principle rafters on a timber frame that we have been working on this winter so I called Amanda to get some professional documentation. She puts my pictures to shame...but that really isn't saying much seeing as I use my cell phone with a scratched up lens.

Here are some more pictures she took while visiting me for lunch at work when I was hewing the purlins for the aforementioned timber frame; she is very talented.

That is Steve's broad axe in the foreground, with his authentic pack basket

Tools of the trade

Peeling off the bark helps snap and keep a more precise line.

Using a plumbet, old school style

Here is one from me in my work duds looking like a certified bad ass.


Usually I don't get any pictures of me actually doing work, because I don't use a tripod, so it is nice when she stops by to take some candids of me getting my woodwright on.

PS. My blog recently went over 10,000 views...crazy, and I wasn't even there to see it tick over. Looks like I will have to be more vigilant when it hits 28,008, and then stand on my head (you'll get it if you are a math nerd).